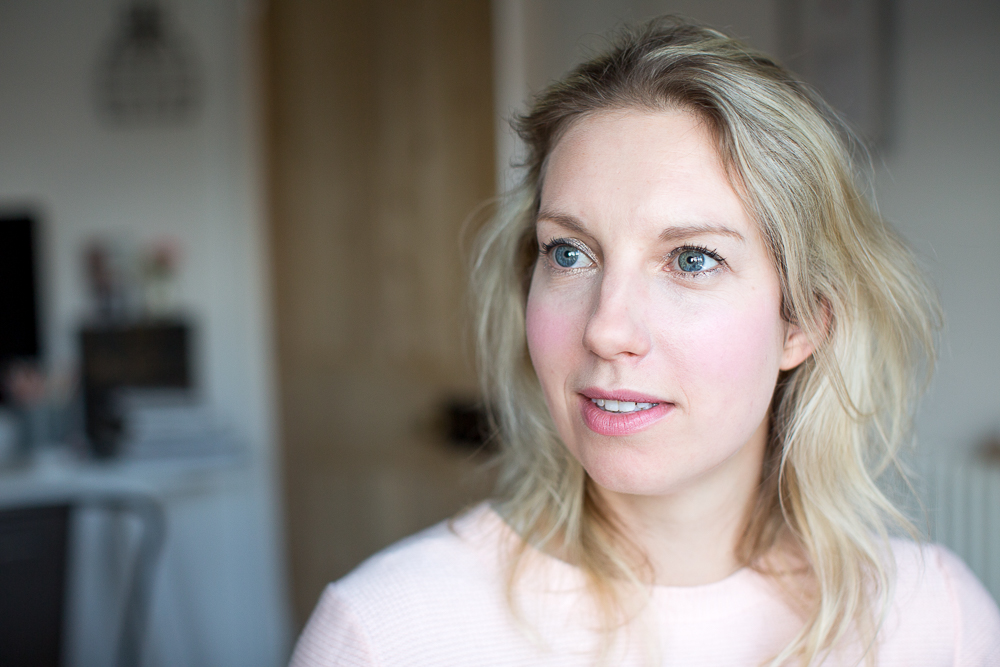
If you read Rock My Style then you may have seen my tutorial for Lottie’s quick and easy beachy waves that we featured on Tuesday, this is the natural (looking!) make-up that I applied and a routine not dissimilar to the one I do on a daily basis.
The whole look takes about 5 minutes, which is sometimes all I have with Mabel hanging from the hem of my nightshirt – I’ve used 9 products here but essentially you only need 6, the grey liner, thin layer of loose powder are “nice to haves” and I’m a big fan of a multi-tasking cream blush that you can also use on lips, in this case I used a seperate chunky lip crayon as the blush (although lush on Lottie’s cheeks) was a little pale for her pout.
I’m aiming for an easy breezy polished glow that makes you appear healthy and “awake” rather than a full on night out on the tiles vibe (erm…those are a rare occasion these days!) and make-up that will fade gradually rather than smudge/melt off/leave weird obvious stains whilst the rest of you looks pale and wan (happens.)
[ezcol_2third id=”” class=”” style=””]
What You Will Need
1. Light coverage foundation/tinted moisturiser with a dewy finish – Choose a product that melts into the skin and doesn’t require endless blending. I rate Guerlain Baby glow, spendy but a little goes a LONG way and it kind of blurs imperfections almost as if by magic, whilst still managing to look like you have nothing on your skin.
2. Eyeshadow cream pencil – Super easy to apply, literally draw it on and blend a bit with fingers. Choose a lightening/brightening hue, I like a gold/champagne for fairer complexions and a shimmery taupe for darker skintones. On Lottie I used Bobbi Brown Long-Wear Cream Shadow Stick in Sunlight Gold. (Collection do a similar shade called “Vanilla Sky” which is waterproof and only £3.19 at Boots.)
3. Light reflecting concealer – I rate the Estee Lauder Double Wear Brush On Glow as it provides me with the PERFECT colour match but L’Oreal Paris True Match Touche Magique is a super budget alternative.
4. Shimmery Grey Eyeliner (optional) – I find grey defines the eyes and is less harsh than black and a little shimmer is pretty. I used MAC Pearlglide Intense Eyeliner in Industrial.
5. Mascara – I like the ones with the curved wands, you can “lift” the lashes up wards which really opens up your eyes (a nifty trick for when you are suffering from sleep deprivation). My favourite is Max Factor Clump Defy because….no goopy bits. And it doesn’t flake or smear all over your under eye concealer.
6. Cream Blush – Particularly for the colder months, cream blush gives excellent glow. Max Factor’s Miracle Touch Creamy Blush is really good value, I’m currently having a romance with MAC’s Casual Colour in “For Your Amusement” as it makes you look as if you’ve just had a brisk walk on a cold winter’s day. And by that I mean a healthy pink, not ruddy and windswept.
7. Lip Crayon – Obviously any hint-of-a-tint moisturising balmy type product will do but this Lipstick Queen chubby pencil in “Catalina” gives definition, has fairly decent staying power and you can apply it without a mirror. (As I write Space NK currently have it in a gift set with 2 other colours for £7.50….)
8. Eyebrow Pencil – Brows don’t half “finish” a face don’t they? I like to use a waxy crayon with a pigmented tint so it fills in gaps and keeps unruly hairs in place in one fell swoop. Sorry to sound like a promoter of MAC today but their aptly named “Eye Brows” crayon takes some beating. I used the ashy taupe shade “Fling” on Lottie.
9. Loose Powder (optional) – This will make your base last a bit longer and takes down obvious shine if you have a particularly oily T-zone. I only ever use a super light dusting and only ever choose a sheeny finish so it’s never chalky, what’s the point in all that glow if you are just going to plonk a load of powder on top? I’ve used Chanel Poudre Libre for years. I use the candle-lit glow hue “Peche Clair”. You can buy Chanel at John Lewis (the ladies always give out generous samples)
How To
1. Begin my blending your foundation/tinted moisturiser all over with your fingers, I use about four 5 pence piece size blobs for an entire face.
2. Blend concealer over any red patches and under eyes. For dark shadows I apply an upside down triangle and blend slightly downwards so as not to emphasise bags.
3. Apply your eyeshadow crayon to both lids, you can apply it underneath the lower lash line to add some reflective shine too.
4. Apply your eyeliner, with a grey shade you don’t have to be too precise, if you’re not happy with your line you can always correct mistakes with a cotton bud.
5. I think an eyelash curler is worth the effort, but if you can’t be arsed, using a mascara with a curved wand and “lifting” the lashes upwards (so there is more product at the root and less at the tip so your lashes are not weighed down) gives a similar open effect.
6. Apply cream blush to the apples of your cheeks blending outwards towards your hairline. I like to use thin layers and build up to my desired shade rather than potentially having an Aunt Sally moment from the off.
7. Draw your tinted crayon onto lips, I tend to go around the lipline to begin with and then fill them in so the shape is soft but defined.
8. Optional – dust a little powder where you feel you might be too shiny.
9. I always do eyebrows last, I figure as the rest of your face is complete then you won’t inadvertently be too heavy handed.
Ta Da!
Super speedy to do. Promise.
Please do share your quick-to-glow secrets in the comments box below.
[/ezcol_2third]
[ezcol_1third_end id=”” class=”” style=””]
Pin The Tutorial

[/ezcol_1third_end]
Photography by Lisa at Little Beanies


I honestly can’t get over how easy this was and Lottie you look fab!! Xx
Thank you lovely! It was super speedy wasn’t it. I plan on copying this look again very soon. Thank you for the gorgeous pics xx
Great post! For anyone with darker skin tones, these are some of the products I use. I’m Afro carribean and really rate Estée Lauder! Like you Charlotte I’m a devotee of the Double Wear Brush on glow, it’s gives amazing coverage but feels so light on your skin and available in a wide range of colours. I also use Estée Lauder BB cream, as I don’t like foundation. Again it feels so light on your skin but the coverage is second to none, I always get compliments on my skin when I’m wearing it.
I alternate between a cream blusher from NARS or a powder one from MAC. I forget the shades for but they both have peach/coral tones which is lovely on dark skin. For brows I swear by Benefit brow pencil, super easy to apply and gives real definition. I don’t tend to use a powder unless I’m going out as it can make darker skin look a bit flat, but I also use the Chanel for this. My routine takes around 5-10 minutes as any longer than that and my daughter would be trashing my room!
Hi Jessica! Thanks so much for your great tips! The Brush on glow is the bomb, I recommend it to everyone. NARS cream blusher is supposed to be great, good lasting power apparently.
Mabel is OBSESSED with my make-up, has been ever since she was tiny, she loves nothing more that to stick her fingers in my lipstick tubes…
Definately try NARS Charlotte, the products are great, you don’t need to reapply them throughout the day and in my opinion have the edge over Mac!
Darcy has a thing for hair products, she rubs them into her hair and always goes for the expensive ones like Redken! Daddy is very scared for the future haha! X
Molly also loves hair products. She sneaks off and applies Moroccan oil to her hair oil the time! She also constantly asks for a spritz of my Chanel before she leaves the house!! x
I’ve never tried Estee Lauder, but will definitely give it a try. I’ve been on the hunt for a decent BB creme for ages. Totally get what you mean about powders making darker skin look flat, so I wanted something that wasn’t as heavy as liquid foundations can sometimes be and was super quick to apply!
This is EXACTLY my make up routine, so funny! Except I am too lazy to bother with the eyeliner and if I’m running really late I don’t bother with the eye crayon either, just mascara. I am dying to try the Meteorites but am worried there won’t be enough coverage. Lottie’s perfect no-makeup skin has done nothing to relieve me of my concerns. 🙂 I’m using By Terry Cover Expert at the minute and it’s great, but I’m attracted to the glowy blurriness properties of the Meteorites. I think I need to visit a counter to see if I can get away with it…
Tracy I would say baby glow is light coverage, it helps with redness/evening out pores and blotchy bits, but I have used tinted moisturisers that offer more in the way of camouflage as it were. MAC was always my favourite – light but made you look very even. I would absolutely recommend going to a counter and trying some on, or take a little pot and ask them to put some in, it’s not cheeky – why would you shell out thirty odd quid for something you don’t know if it works or not! I am forever in John Lewis with my plastic posts……the ladies in there are super nice and let you try everything x
Thanks Charlotte, will definitely try that. I’ll probably buy it anyway, I can always mix it with a higher coverage one on the days I need a bit more help!
Wow this looks super easy even I might be able to do it. I always joke that I missed the make up lessons at school as I really don’t have a clue, especially eyes!! My friends always dispair at my make up bag. But I promised myself to make more of an effort this year as I hope to return to work after being a stay at home Mum for a while. So I’ll have to have a look at some of these products…… X
Glad to help Becca, if you are not an “eyes” person definitely try out one of the crayons, very natural and you can build up colour to make it more noticeable x
Love this tutorial! Think even I could achieve it. Also love Lottie’s jumper, where is it from?! X
It was rather speedy so give it a go! The jumper was from Banana Republic last year. They have some lovely jumpers so worth a peek x
You look lovely in natural makeup. Also, can we use pressed powder rather than loose powder. I have also found another natural makeup tutorial which was easy to put on.