If you read my breastfeeding story with Hector here on Rock My Family a couple of months ago then you’ll already know that I hoped to breastfeed him until he was about six months or until I felt happy to stop. As we all know, the best-laid plans often go awry and it so happened that Hector ended up being bottle fed (albeit with breastmilk to begin with) from the first week.
I was heartbroken that I wasn’t able to breastfeed (more about that in the post above) but I was incredibly lucky to have a lovely group of very generous friends who had purchased a whole heap of useful things prior to me giving birth. Combine this with a super practical mother and my control freak tendencies and I unknowingly had pretty much all the equipment I needed to go down the bottle feeding road without having to dash out to the shops for more supplies in the first couple of weeks.
This post isn’t about debating the pros and cons of breastfeeding versus bottle feeding; you lot already know that a fed baby is a happy baby whichever method is used. Instead this post is about providing you lovelies with a handy checklist and our snippets of advice gleaned from our own experiences for the mamas out there. We hope that this will help those of you who are about to embark on a bottle feeding journey whether that be with a newborn or with a baby making a transition from breast to bottle.
Bottles
Probably the best place to start is with bottles themselves and folks it is a jungle out there! I can only recommend those brands I’ve personally experienced or those tried and tested by close friends of mine. First up then has to be Avent which I used throughout Hector’s own bottle feeding journey. I opted for Avent’s Natural baby bottle range buying both the 260ml and 125ml sizes, the latter being perfect for early newborn stages before moving up to the bigger bottles as Hector grew. In total I had about 6 of the smaller size bottles and then about 8 of the larger so that I always had a couple close to hand without having to constantly wash up bottles for the next meal. It also meant I could sterilise in bulk too.
As Hector moved onto solely formula milk, having all those spare bottles meant I could fill all of them up with boiled water and allow them to cool ready for formula to be added as required.
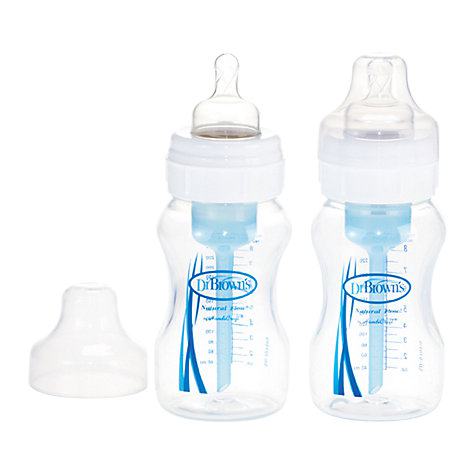
I was lucky in that Hector didn’t suffer from either reflux or colic so we didn’t need to invest in specialist bottles but I’ve heard lots of good things about Dr Brown’s Natural flow bottle for Colic relief and also about Medela’s Calma bottles which are said to imitate the sucking behaviour of the baby at the breast. Having seen the teat in action I have to say that it looks fairly impressive and I can see how it can help to reduce nipple confusion – I’d love to hear what you mamas have to say if you’ve had any prior experience of them.
Teats
Not a huge amount to say about teats other than what’s already been said above. Just make sure that you have enough for the number of bottles purchased and that they’re appropriate for your child’s needs. Don’t be lulled into thinking that your child should move up to the next level of teat just because he or she has grown older either. Hector only moved up to size three teats when he was 11 months old since he found the flow too fast for his little mouth at a younger age.
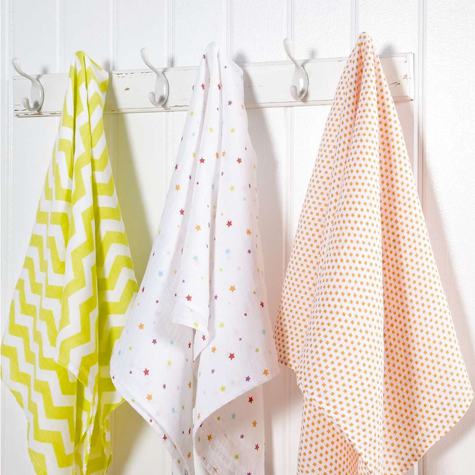
Muslins & Bibs
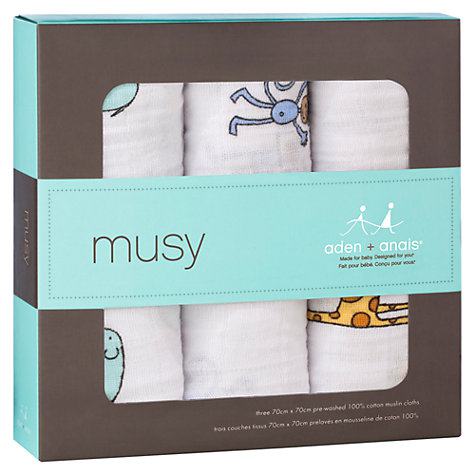
I had literally hundreds of muslins (you can never have too many) purchased for me by friends and family when I was pregnant but by far and away my favourites were some plain white numbers by Mamas and Papas. They were super soft and amazingly absorbent – which I found wasn’t always the case with cheaper ones – and these were the ones I regularly reached for in the muslin drawer.
From a practical perspective I tended to keep to the all white spectrum as it meant I could wash them in bulk at a higher temperature without worrying about colours running. But for those of you who like a bit of colour in your life I particularly like these supersized ones from Mamas and Papas which can also be used as playtime blankets and changing mat covers. Aden & Anais are supposed to be top dog on the muslin cloth front but I’ve not had any personal experience; these jungle themed versions are cute though.
Equally bibs are another personal preference. Certainly when Hector was very small, I forwent bibs in favour of a muslin tucked under his chin, it was easier for me and softer on his skin too. When he started teething we purchased these farmyard inspired bibs to keep the drool at bay.
Bottle Steriliser
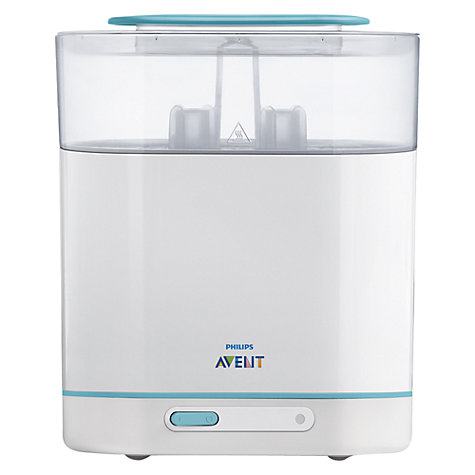
One of my best friends bought me the very sexy steam steriliser from Avent and presented it to me during my baby shower to excited yelps of glee from me. Yep that’s how exciting my life had become at eight months pregnant. I hadn’t envisaged cracking it open quite so early on after Hector was born but it was an absolute godsend and did its job perfectly every single time.
It’s currently in storage to be used at some point further down the line and still looks as good as new. From a practical perspective I found that I could get a substantial amount loaded in during each sterilising session without packing it too tightly to compromise its effectiveness. I’d pre-wash all of Hector’s bottle-feeding equipment first with hot soapy water and then sterilise it afterwards. Bottles can be placed in the bottom compartment and smaller items such as teats and dummies lined up in the top section.
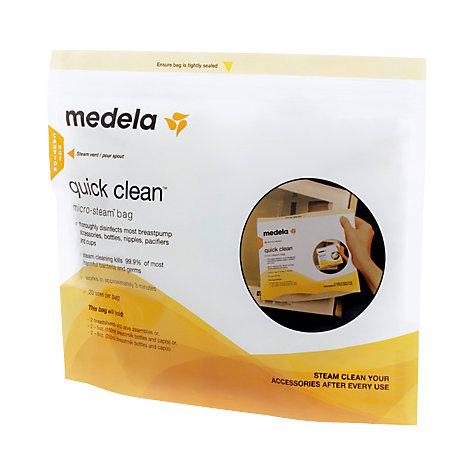
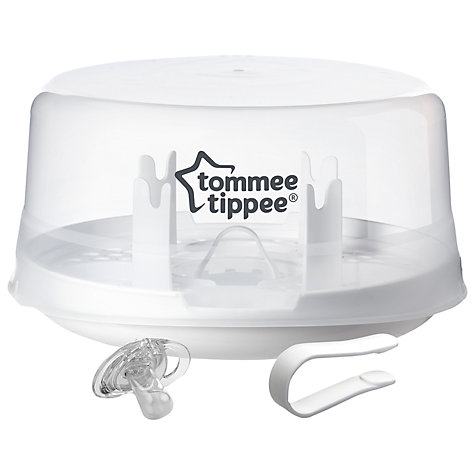
If you’re someone looking to sterilise via microwave then this version from Tommy Tippee holds four bottles and sterilises all accessories in 4 to 8 minutes, depending on the wattage of the microwave. For total convenience, the contents stay sterile for 24 hours if the lid is left unopened. Equally these microwave steam bags from Medela disinfect breastfeeding accessories and bottles and tubes in less than three minutes and can be reused up to 20 times.
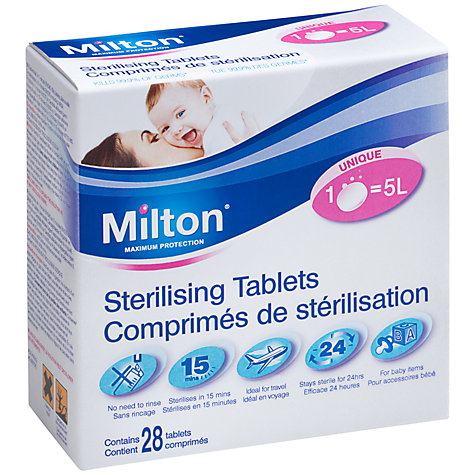
If you prefer cold sterilising then these tablets from Milton are a safe and convenient way to cold water sterilise your babies equipment in just 15 minutes. They are said to kill viruses, bacteria, fungi and spores and the baby safe formula means there is no need to rinse after sterilisation.
Bottle Brush
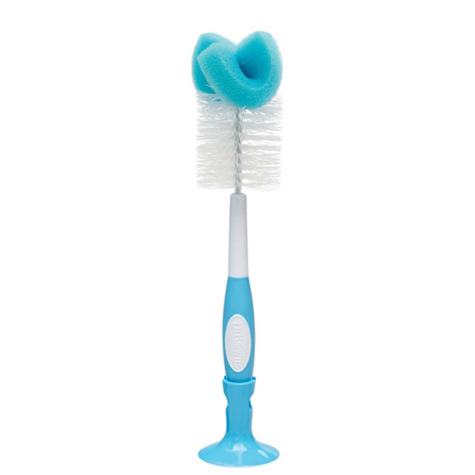
Vital for scrubbing away old milk and preventing build-up and a breeding ground for bacteria, a bottle brush will be your best friend throughout your bottle feeding adventures. I rate the Avent one highly from experience but I also like the look of the version from Dr Brown’s. Featuring a combination sponge and bristle brush head for thorough, easy cleaning of bottles and it also combines chevron channels at the base of the brush to clean teats.
Alternatively I also recommend forcing washing up liquid and water through the holes in the teats (with clean hands of course) to ensure there’s no milk left behind to block up holes.
Breast Pump and/or Formula
There’s not really much to be said about formula here other than make sure you’ve got the right formula for your baby’s needs if you’re choosing to bottle feed and enough of it. I always make sure I have a back-up box in the house just in case I run out of the box I’m currently using unexpectedly.
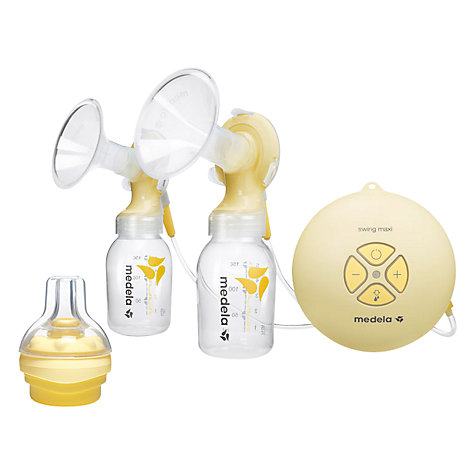
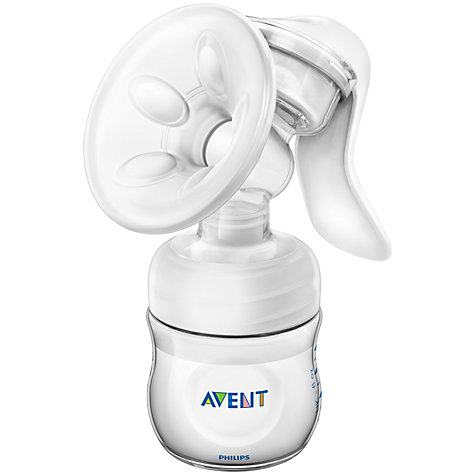
Even if you’re intending to breastfeed you’ll find that there might be times when you’ll need to bottle feed your baby albeit with breastmilk. Whether it’s because you need to go back to work, you’re popping out on a rare night out or perhaps have succumbed to a nasty bout of mastitis, chances are that you’ll express at some point. I know some girls who are, incredibly, able to hand-express but for the rest of us a pump will do the trick admirably. A friend purchased this hand-held pump for me which I expected to use on the odd occasion here and there and which was my saving grace in the early days before moving over to a hospital grade electrical pump that prevented my arms from becoming scarily like popeye’s!
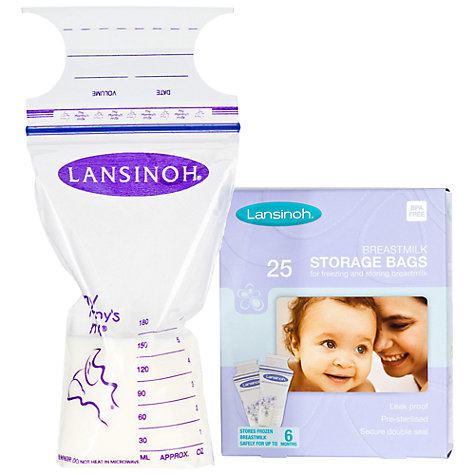
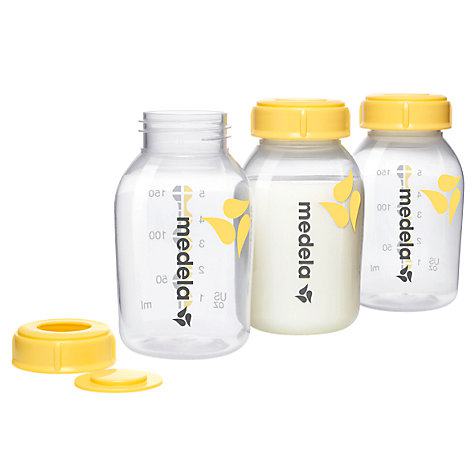
If you’re keen to buy your very own electric pump then I 110% recommend the Medela Swing which I’ve heard is excellent from pretty much every single one of my friends. Its small and compact design is easy to use, transport and store and you can opt to use the machine with batteries if you’re not near a mains plug. You can also buy storage bottles from the same brand to keep the milk in or storage bags from Lansinoh that you can pop in the freezer for use at a later date.
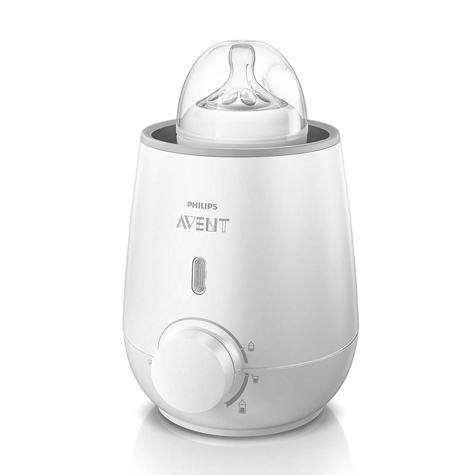
Bottle Warmer
Bottle warmers. Now this could be considered a frippery rather than an essential but I’m inclined to pop it into the latter category. Technically it is just as practical to pop a bottle in a jug of hot water requested from a cafe or restaurant while you’re out and about and at home you can create your optimum milk temperature from a mixture of recently boiled water and cooler boiled water. This is great in theory but when your baby is born near the tail end of Autumn and has a particular penchant for very warm milk you often find yourself despairing about the length of time it takes to warm a bottle up. Combine that with a resistance from some establishments about giving you boiling water and you’ve got the recipe for a perfect storm.
I heartily wished I’d just bitten the bullet and bought a travel bottle warmer and really the same applies for an ‘at-home’ version too. It would have saved so many tears and reduced my stress levels hugely.
Obviously there are different models for different bottles but I liked the fact that Philips’ Avent baby bottle warmer is able to warm milk quickly and evenly in just 3 minutes and features a defrost setting and can also be used to warm baby food.
Equally the travel version from Tommy Tippee holds enough water to warm up two feeds when you’re out for the day, keeping water warm for up to 6 hours whilst you’re mobile.
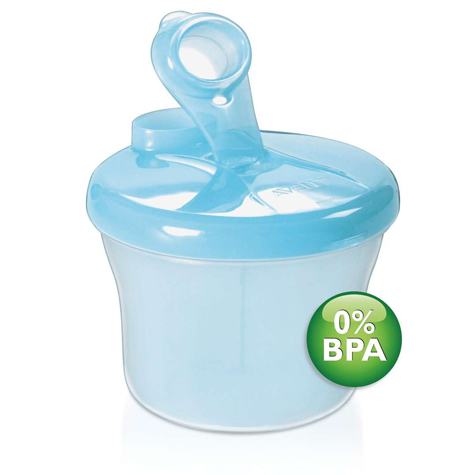
Powder Dispenser
Handy for when you’re on the move, simply pop your required amount of formula into this powder dispenser and off you go. There are lots of different types of formula containers on the market but I loved Avent’s handy little unit which carries three pre-measured portions of milk powder in separate compartments. Just pour the powder into a bottle of pre-boiled cooled water as required and off you go; the inner sections can also be removed so that the whole thing can be used as a bowl or container later on in your baby’s weaning journey.
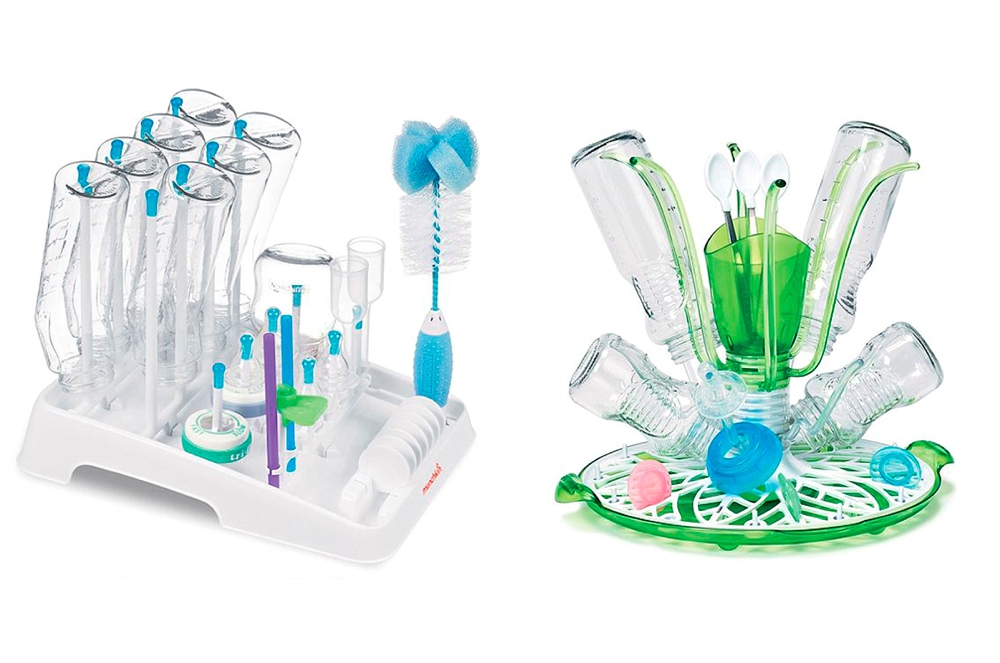
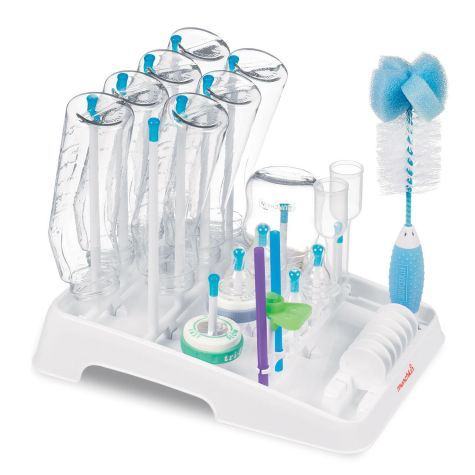
Bottle Rack
We didn’t actually purchase a bottle rack for Hector’s bottles as they tended to dry out in the steriliser to begin with and then when Hector reached about 11 months we switched to the dishwasher which again dries everything as part of the cycle. That said I know plenty of friends who sterilised using fluids rather than by steam or microwave methods and needed something to dry their multiple bottles on.
Munchkin seem to have cornered the market with their Sprout and Deluxe drying racks which are able to hold bottles, teats, cups, valves and straws as well as a bottle brush. The Deluxe version also folds flat so you can store it away in a snap and the Sprout spins on its base for easy access.
Lastly I would say that it’s worth investing in a washing up bowl just for bottles when you’re washing them by hand in the early days. That way you can pile them up in there ready for a monster bulk wash without cluttering up your sink with baby related paraphernalia.
Hopefully our recipe of bottle feeding essentials will help those of you preparing for your new arrival or act as a guide for those of you transitioning from breast to bottle. We’ve also included a handy checklist as part of this post that you can download and print off to be doubly sure that you’ve got everything whilst shopping. Let us know if there’s anything else you simply couldn’t live without as this might help another mum too.
BOTTLE FEEDING DOWNLOAD
CLICK TO PIN


The other thing I would recommend in a perfect prep machine – they are expensive but so handy to make a fresh bottle without waiting for the water to cool etc etc. Ours has been one of the best baby related things we’ve bought.
And I think I’ve mentioned this in a previous posts comment but as mother of a boy who was bottle fed from 4 weeks and had severe reflux, I found muslins also very useful to lay on the floor whilst feeding so the inevitable sick would land on that, thus protecting the carpets.
Very helpful! My baby is due in 4.5 weeks (eek!) and I do intend to breast feed but who actually knows what will end up happening. In all my antenatal appointments and classes there has been heaps of info on breastfeeding but nothing on bottle feeding if you can’t or don’t want to breastfeed. Having this handy guide on what you need is a great resource just in case my feeding doesn’t go according to plan.
I totally agree! I really struggled to find helpful advice on bottle feeding… My little girl was exclusively breastfed for 4 months but due to unidentified food allergies we switched to formula, but I basically was left to work it all out for myself! i asked midwives, my health visitor and ultimately our paediatric dietician for help and was always met with vague answers. Thanks RMF team, great post! X
Great ideas Lolly! I moved from breast to bottle at 3 months and buying all the equipment is a minefield. Nearly all of our stuff (bottles/ tears/ micro steriliser etc) is tommee tippee closer to nature. The best bottle brush I have found is a plastic one from boots with a thick plastic handle, I find all of the ‘twisted wire’ ones snap really easily.
Without a doubt my BEST purchase is the tommee tippee perfect and prep (??) machine. It’s makes a perfectly sterile bottle in a minute which comes out at the perfect temp for immediate feeding. I’ve got the black one and I tell myself it looks like a Nespresso machine on the worktop ? At home this is what I use as I really panicked about all of the official recommendations about boiling/ cooling etc, I read that because the powder is not sterile you shouldn’t add to cold water as it needs 60 degrees plus to kill the germs?? Who knows!
Sorry for rambling ? So I can recommend the little pots to pre measure formula which sit neatly inside the bottle and the machine for home, and pre made bottles for out of home, just pour into your sterilised bottle ( which if you’ve got a picky one like me you’ll have to somehow wam up!)
My understanding of the scalding/germ killing thing with formula is that you should make up 2/3rds of the bottle with freshly boiled water (therefore scalding the powder and killing any rogue germs), and then you can top it off with previously boiled cold water which has been kept (sealed) in the fridge – thus cooling it down to drinking temperature. Not much help when you’re out and about though!
Ah that’s a good idea Sara. What I’ve done when we’re out before is take a flask of boiled and cooled slightly water and made the bottle up that way, you could also take one of boiled and very cold. The ready mades are expensive but they make it so convenient. If I know the bottle is due an hour or less from when we leave I make it up at home using the machine thingy and wrap it in an insulating sleeve x
I have been lucky with our little lady taking well to breastfeeding but I was prepared for all scenarios and got the Avent nature kit whilst pregnant! Aden and anais muslin swaddles are the best thing we bought!! So useful for a baby with reflux and big enough to use folded instead of cellular blankets when she was too small for sleeping bags. They wash amazingly well and stay really soft. She has really taken to the comfort blanket version too, I found it difficult to find one with ribbon around. http://www.naturalbabyshower.co.uk/collections/aden-anais-issies-musy-mates/products/aden-anais-issie-security-blanket-jungle-jam-giraffe
As others have mentioned, your comments on making up formula are not recommended by health care professionals. Formula is not sterile and should always be made up with recently boiled water over 70°c, and then cooled to the required temp.
Perhaps worth getting a midwife or health visitor to check over the article.
I can also recommend the tommee tippee bottles and teats which after 7 months of constant use look as good as new. My son never got on with the NUK version, but my sisters 4 kids all used them.
Oh and i am a huge fan of cold water sterilising!
In my experience NUK bottles, Mam and Lansinoh bottles are great, especially for babies born early and breastfeeding/combined feeding babies.
I remember reading a study about sterilisation and found that cold water was the most effective after they swabbed and grew cultures of the tests, followed by hot water and soap, then steam and lastly just dish washer!
It’s so hard being a new parent as so many people have advice they want you to follow as it worked for them; I think it’s all about going with your own instincts and a lot of trial and error!!!
“This post isn’t about debating the pros and cons of breastfeeding versus bottle feeding; you lot already know that a fed baby is a happy baby whichever method is used. ” – such wise words Lolly! I wish I had read this sort of thing when we were going through our breastfeeding-tongue-tie hell and I felt like such a huge failure (thank you Midwives…)
I can already see this Comments section is being inundated about the Tommee Tippee Perfect Prep machine. It’s been our saviour too. At about £60 it isn’t cheap but it’s easily the best value baby gadget we own. We call it our Baby Nespresso and we even take it with us on hols.
Finally, I really wanted to recommend MAM bottles to everyone. They’re self-sterilising, which basically means you can just put them straight in the microwave without a separate steriliser. They were originally recommended to us by our incredibly pragmatic lactation consultant Claire Byam Cool because they’re anti-colic. They’re also very pretty!
I found this microwave steriliser brilliant. It holds less bottles than the big electric one but was easy to transport to friends/families houses on weekends away 🙂 And I ended up using it over my electric one in the end. Could have saved myself a fortune if I’d known about it first! haha. Wonderful post x
I can’t sing the praises of the tommee tippee perfect prep machine loudly enough! It’s a god send! Perfect temperature bottles made in under a minute! It’s often on offer on Amazon and I’ve seen it in sales such as mamas & papas, mothercare etc, do definitely keep an eye out if you plan to bottle feed.
Also, mam bottles are brilliant. They also reduce colic without being as fiddly as dr brown bottles. You can sometimes pick them up in tkmaxx or if not, they do go on offer in boots quite often.
As for sterilisers I have the tommee tippee electric steriliser which fits my mam bottles perfectly. Beware that some microwave steralisers are pretty big and won’t fit if you have a smaller size microwave. I bought one for holidays but it’s never fit in any microwaves except for my large one at home. So now on holidays we use Milton steraliser tablets, super easy to use and so small in your case! Just remember you need a 5l plastic container to steraliser in (if I remember correctly), we generally use a washing up bowl which does the trick nicely.
Ladies the Tommee Tippee Perfect Prep machine is currently £60 in Asda!!! Reduced from £119!!! Go Go GO!!! http://rstyle.me/n/bnbbyhbyhff x
Also just wanted to add – we didn’t get on with the Medela Calma teats at all – they seem to be really hard work for babies to get any milk out of the bottle and have more bits to wash and sterilise than other ones. It wasn’t a huge issue for us, as Elle was breastfed, but when she went to the childminders I’d send her with a Lansinoh Momma bottle, she much preferred drinking from that and they’ve been specifically designed for breastfeeding babies too.
AND even if you are breastfeeding, introducing a bottle, once you’ve got feeding established is highly recommended! Even if it’s just every few days with a tiny bit of expressed milk, it will really help you later on down the line when you’re going back to work. There’s a concern about ‘nipple confusion’ but I honestly think once you’ve got feeding established (after a few months or so) a bottle every few days is a good idea x
I also recommend the Mam bottles, we tried Tommie Tippee & Dr Brown ones first but I preferred the shape of the Mam teats (the others are bigger which was stressful when my son was fighting his bottles due to reflux). Boots provide a free newborn Mam bottle & dummy as part of their parenting club which is a great way to try the brand out.
We call our Tommie Tippee Perfect Prep the magic milk machine! It’s so handy, especially at the start when you’re still trying to figure everything out. All the rules concerning formula are very confusing, especially with a screaming hungry baby in the house! I now copy the Perfect Prep machine when out & about – I just ask for the right amount of boiled water in a cafe, add my formula, shake & top it up with cooled boiled water (I find the tommie tippee bottles with lids are great for carrying this around) and shake again. The bottle is ready to go straight away!
I would also recommend buying some of the pre-made bottles as a backup … I hadn’t used any in ages but was so grateful to have one in my bag yesterday I realised I had forget to pack the formula container!
Great post!
I *really* struggled with breastfeeding for the first 2/3 months or so, so quite early on I decided to combination feed, (just substituting the early evening feed with bottle) which broke my heart and I cried about being a failure/M getting the dreaded ‘nipple confusion/her rejecting the breast, which looking back seems so stupid now, but at the time was just awful.
She ended up having her first bottle when she was just a few days old in the middle of the night…..we were all beyond tired, I was crying (again), Martha was crying (again), my nipples were in bits (as well as my bits being in bits!) and I didn’t seem to have enough milk to feed her…..my husband suggested a bottle and I reluctantly agreed……
Let me tell you trying to work out how to use the steriliser, faff about with bottles, cool said bottles (which seem to have heated to a lava like temperature and took forever to cool) all with hardly any sleep, through my own and our screaming babies tears, was a particular low point.
My tip is to work out how to use steriliser and all the gubbins that go with it and perhaps do the initial sterilising (I’m sure we had to do it once with nothing in and then with the bottles in) as although it seems easy and it is, nothing is easy in the state we were all in!
We also had a few emergency ready mixed bottles of formula stashed away…..I’m sure our NCT leader told us not to do this…..apparently it’s like a recovering alcoholic having a bottle of vodka in a a cupboard, the ‘temptation’ may become to much and you give up breastfeeding……what a load of rubbish…..!
The moral of my story is be prepared, even if you are breastfeeding!
Oh Jane, I love your comment about NCT! And your advice to be prepared is so so true. I have had friends who were determined they would breastfeed then ended up sending husbands out to a 24 hour supermarket to buy ready made formula because they were struggling so much and didn’t have any bottles or anything. I made sure I was ready just in case after that. xx
This is great and I would definitely recommend being prepared. We had everything ready just in case as the last thing I wanted was to have a hungry newborn because I couldn’t breastfeed for any reason. In the end we went the other way and the girls wouldn’t take any bottles at all! It took a while but as Fern said it is worth trying with a little bottle now and again as it really does help if you know they will have one. We went for the Philips Avent steriliser and bottles but I have to say the Medela steriliser bags were a life saver for holidays and trips out. Amazing things, I can highly recommend them x
I would definitely agree with feeding from a bottle even if you’re breastfeeding. I introduced a bottle of expressed milk from the second week and it made me feel so much happier knowing he would take a bottle if I was out/ needed a break. I think nipple confusion may be a bit of a myth. X
Hello! I have had two children, both of them bottle fed mostly due to breast feeding disasters. They also both had cows milk protein intolerance. I just wanted to recommend to other mums (echoing some of the other posts above!) the Tommy tippee perfect prep machine- oh my flipping goodness it changed my life! Because they needed the special prescription formula (it doesn’t come in those handy ready mixed travel bottles) it made the whole making the bottles up so much easier! I know it’s quite pricey but honestly it is amazing and took the whole stress out of warming/waiting for it to cool etc completely out! I WISH I had known about it for baby number 1.
Katie x
Hey,
I just noticed a good offer and thought I’d share with the group The Insiders are looking for parents to try various baby & toddler products for free and leave feedback. I’ve taken part in these before and they’re a pretty good way to try out new products.
Checkout the links below!
https://www.theinsidersnet.com/…/in…/18588/nestlecerelac.htm
https://www.theinsidersnet.com/…/18566/smaprotoddlermilk.htm