This week Rock My Family turns one. So it was only fitting that we had a post about one of our favourite subjects, cake. Most of you won’t know that my original name when I joined RMLtd was ‘Charlotte Cakes’ and then just ‘Cakes’. For the simple fact that I make cakes. And a lot of them. Aside from everything else I make wedding cakes and I ended up getting to know the team here from various photoshoots.
You would therefore think I am a wizz when it comes to my girls birthday cakes. I’m not. In fact more often than not I end up frantically trying to pull something together the night before the big day. It seems I have something of a lastminute.com attitude to their cakes.
I feel an immense amount of pressure, mainly from myself, to create them some sort of showstopper which is silly really. They are 3 and 4 for heavens sake! Over the last few years I have come up with a few simple ideas (and quite a few cheats) to create a cake that any kid would be proud of.
The biggest thing I need to stress is that the cake does not need to be perfect. I repeat it does not need to be perfect. This is a lesson I have had to learn myself but believe me, no two year old is going to notice if the cake is slightly wonky or your icing isn’t perfectly even. My favourite memories of my childhood birthdays were some of the wondrous cake creations my mum came up with. Namely the caterpillar made from swiss rolls and the amazing castle cake that had ice cream cones as turrets. I couldn’t tell you if they were iced spectacularly only that as a kid I was in awe.
The Insider Tips
Before you get started I thought I’d share a couple of my insider tips. I always use 3 layers of sponge cake as I like my cakes to be nice and tall. I have deep tins so use one quantity of the ingredients for each sponge. You can split between two sandwich tins if you prefer and in which case I’d probably do two batches (four cakes in total).
My basic recipe is a simple one. Cream together 8oz of butter and 8oz of caster sugar with a few drops of vanilla essence. Then add 4 large eggs and finally fold in 8oz self raising flour. You can add in any flavours you like at this stage. Place in 8inch tins and bake at 180c in a fan oven for around 35 minutes (20 for sandwich tins) until a skewer in the middle comes out clean.
Once the cakes are cooled take a sharp seated knife and trim off the top dome of the cake to make it nice and flat. Then fill with your choice of buttercream. Leave to rest for a good hour or pop in the fridge for 20 minutes to help everything settle. Once this is done apply what is known as a crumb coat or a thin layer of buttercream all over the cake. This doesn’t need to be perfect but provides a good base for any further buttercream or icing you might apply.
If you are confident with icing you can use this to decorate but if not I find buttercream a much easier (and tastier) option.
Simple Childrens Birthday Cakes
Ombre
I love a good ombre cake. It’s my absolute favourite. Mix up a batch of buttercream and then place around a third in a bowl. Add in your colour of choice. This needs to be the darkest shade so mix until the required colour is achieved. Using a palette knife apply around the bottom third of the cake. Then add another third of buttercream in to the original bowl to give you a slightly lighter shade. Add this to the cake above the first layer. Don’t worry if it isn’t smooth at this stage. Repeat with the remaining buttercream and spread over the top third and top of the cake. You can leave it textured or to get it smooth hold you palette knife, smoother (or even a ruler) against the cake and run it round.
Funfetti
Mix hundreds and thousands or sprinkles in to your cake mixture and buttercream. It gives a really fun effect. Finish with a cute topper and voila.
Drizzle
A good drizzle is an excellent addition to any kids cake. Melt up chocolate or candy melts and pour over the top of your cake. Don’t go too mad as it will drip down the sides a lot.
Rainbow Cake
A rainbow cake is a definite hit with kids. It may look plain on the outside but cut in to it and a myriad of colours appear. You can find my recipe here on Rock My Style.
Piñata Cake
This is a seriously fun idea. As an additional surprise cut a hole through the centre of your middle cake layers, fill with treats or fruit before putting on the top layer and icing. When you cut in all the goodies will tumble out. Decorate as required.
Characters
If Peppa Pig is the order of the day or if your heart sinks when they mention a frozen cake then fear not. I have the simplest cheat for you all. It is one I use myself frequently. Yes, I could sit and craft replica figurines out of sugar paste but they are definitely not my forte. A beautiful blooming sugar paste rose is no problem but Elsa and Anna not so much. My trick here actually gives two surprises in one for your littles. Buy the toy figurines. Yep, just buy them. When Molly requested a Tinkerbell party last year I started thinking about how long it would take me to model said fairy. I realised I had neither the time nor the inclination. Plus the modelling paste would have set me back around £10. Instead I popped to the Disney store and picked up a pack of the Pixie Hollow fairies for £12, wrapped them up as a gift for the birthday girl, then swiped them away to pop on the cake. So she got some cute toys to play with and I got all the effect and non of the hassle. I’ve done the same with Peppa Pig for Alice with a few sugar paste muddy puddles. Super simple.
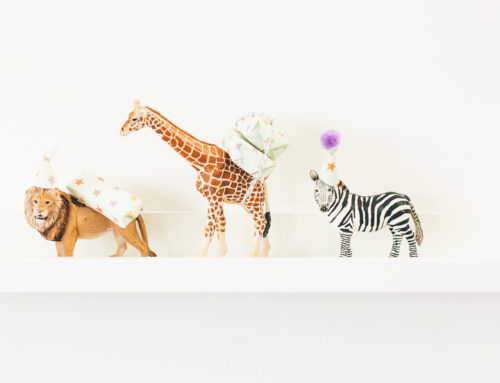
Animals
My absolute favourite toy purchases for the girls over the years has been their vast collection of Schleich animals. Mainly due to their vast array of uses in my prop box and general awesomeness. You will probably have seen them grace many a Pinterest worthy cake. These cute figurines can transform any cake in to a super stylish yet super fun cake. I am known to make mini party hats for the animals to wear which is possibly my favourite yet. They have graced everything from a circus cake to a jungle Dora inspired creation.
Donuts
I am by no means suggesting making your own donuts. No one has time for that do they? Instead buy some supermarket ones of your choice. You could go for pre-iced but I love buying jammy donuts or the mini variety and adding my own colours and sprinkles to match the party. The kids love helping with this too. Once the donuts are ready simply pile them haphazardly on a stand or plate. Add some bunting or a topper and voila!
Diggers
For any digger mad littles out there this is a great option. Make a big chocolate cake and cover with chocolate buttercream. It doesn’t need to be neat as is meant to look like mud. Add some yellow toy diggers (yep another use for toys). Pile up some maltesers and crumbled flakes to give mounds of boulders and dirt. For added wow take a spoon and scoop out a chunk of cake from the edge.
Animal Faces
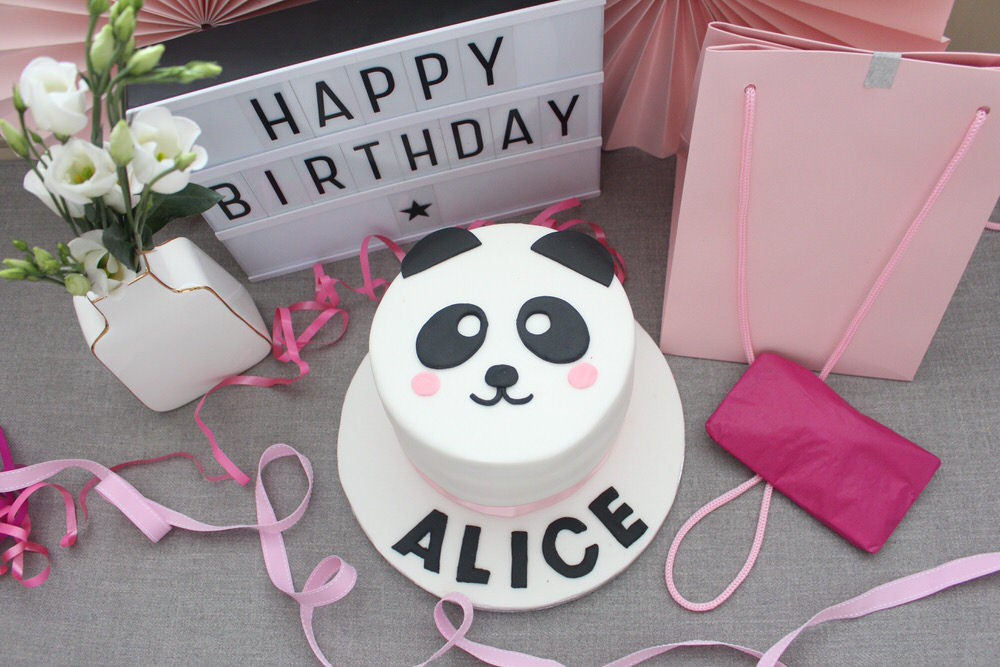
With a bit of imagination you can create some of the cutest little animal faces. Start with an iced cake and then add a few simple pieces to create the face. Use some sugarpaste in the colours of your choice to make the pieces. You can either freehand it to cut them out or draw it on to paper, lay this on the icing and then trace the lines using a blunt tool. I would normally leave the pieces to settle slightly over night as it stops them being too flimsy. If you can get hold of it I use flowerpaste (Sainsburys and Tesco sell this) for pieces like the ears as it dries firmer. The panda cake is really easy. Just cut two ovals for the eyes and two semi circle for the ears. Add a small nose and lines for the mouth. Then squish a little bit of pink icing for the cheeks. He is just the cutest.
Hungry Caterpillar
There was a lot of love for the Hungry Caterpillar cake I created for Alice’s 3rd birthday and you can actually create this rather easily (she says!). To create the fruit pieces I just cut these out freehand from coloured sugarpaste. I then created a little hole in each piece. I used a cutter but you could use a straw or similar. I then used the round cutter to create lots of different coloured circles for around the bottom. I stuck them on using edible glue or just use a small brush of water. For the topper I used modelling or flower paste and created lots of round balls which I squashed together in the caterpillar shape with a red head. I then inserted two cocktail sticks in to the bottom ready to add to the cake. Leave it to dry flat for at least a day before adding to the cake. If you fancy an easier option ice a selection of cupcakes with green icing and a larger round cake in red icing for the head with eyes and detailing added. Then simply arrange in a caterpillar shape on the table.
Flowers
Flowers are not just the domain of wedding cakes. Add some pretty blooms and foliage to your cake to make a super pretty display. Do check they are suitable for adding to cakes first. For Mabel’s first birthday I made a two tiered semi-naked cake which we decorated with fresh lilacs and sweet star toppers. You can see the full party here.
Toppers
A cute topper can completely transform a cake. Everything from pom poms to bunting or cute wooden wording. Have a look on Etsy for some great options.
I hope that’s given you a bit of inspiration. Please do leave any cake related questions below and I’ll do my best to help out!
All cakes by Lottie except Chocolate Bear Cake, Digger, Sheep and Whale via Pinterest.


You are a genius lady! They all look incredible.
Despite being able to bake a decent sponge, my presentation is always a little ‘informal’. I think I maybe need more patience as I seem to end up with every layer of buttercream being a crumb coat. I need to up my game and get that sorted!
Amazing inspiration Lottie. I could look at your cakes all day ??xx
Ah thanks Karen. You know I love a good cake. Informal is the best. It’s all about the taste anyway so don’t worry too much about imperfections. Whack some more buttercream on and all is good with the world xxx
Ah thanks for this! My little girl is one on Friday! I’m not being too adventurous this year, I’ll work my way up to that!
I love these Lottie! May I be cheeky and ask two questions?
1) How did you do the shimmer icing on the doughnuts?
2) How did you do the icing on the circular marble cake? Looks amazing!
Thanks x
Of course you may. The shimmer on the doughnuts is edible glitter. A lot of super markets sell it now or you could use glitter/pearlescent spray. Again from the supermarket. Waitrose has an excellent range or Sainsburys has a fab cake decorating selection in the bigger stores. On the circular cake I just used normal icing but didn’t make it too runny. I poured it on the top and let it drip down the side. You can push it towards the edge a bit with a spoon to help it along. Then add sprinkles. xxx
Thank you! Xxx
Ahh this is brilliant for a Monday morning cheer up. And we have the same basic sponge recipe, instilled by my Nannie in this case…8,8,8,4; ,4.4,4,2 etc…
My problem comes with “apply the buttercream with a palette knife”. I need a palette knife as for S’s first birthday I attempted a normal knife and it was a total mess (not that she cared). Even with a palette knife I think I will struggle though… It’s become a family joke that I cannot ice or pipe to save my life. Hence great reliance on things like smarties to mark out numbers etc…
Love a family recipe. It’s so easy to remember. A palette knife definitely helps so hopefully it will all work out. I like the textured buttercream anyway so don’t worry about lumps and bumps. If you want it smooth you could use a ruler. Stand it upright against the cake with the side/thin bit facing the cake and just run it round. No fancy tools required xx
The digger!! ????????
Well after weeks of stressing about how to make a mermaid cake – I mean how?! – I have just bought a bunch of figurines for £7.50 from eBay. Now just to get those sponges to rise, what diameter tins do you recommend for those quantities? I think that is usually my mistake.
Love a mermaid cake. Sounds amazing. Oops, forgot that important bit of info. I’ve just amended it and added it in. I use an 8inch mainly or sometimes 6inch but do half quantities. Happy baking xx
Ahh Lottie these are fabulous!
I always have grand ideas, but my skill and time management let me down….!!
I’m planning on making a rainbow/unicorn cake for my little ones second birthday in a couple of weeks…….the recipe I have found to follow says to make the sponges and then freeze them overnight and then defrost for icing, which I have never done before, have you ever done that/would you recommend it?
I think you could do a whole post on ‘Ask Lottie’ -the baking edition!!
Ha ha ha, I’ll make it a regular column. A rainbow unicorn cake sounds immense!! I never freeze cakes but I think the only reason it would ask you to do that is to to ‘stabilise’ the cakes to make them easier to ice. It kind of firms them up I suppose and os quite an American thing to do especially on rainbow cakes. Personally I’d bake the cakes the day before then just leave them to sit. You can always apply a crumb coat (above) that day as well and pop in the fridge for about an hour before you start the main icing. Entirely up to you though as nothing wrong with freezing them as I said and I wouldn’t want to be to blame for the cake going wrong!! I use this recipe for my rainbow cake which always works well and then you could just ice as per your other recipe http://rockmystyle.co.uk/rainbow-cake/ xxx
Perfect post for Monday morning Lottie! I love all of them. I need to make a cake for my husband soon …. I’m sure he would love a rainbow confetti pinata cake with animals on the top. I’m so going to steal the sparkly mini doughnut idea for A’s party next year. Also just realised I do my ombre backwards – seems to make a lot more sense starting with the darkest colour. Just so much gorgeous inspiration – thank you very much x
Perfect timing, I am just planning my daughter’s first birthday cake for a couple of weeks’ time! I LOVE these ideas, I am going with a 2D lion’s head, and I am going to attempt to make a sugarpaste mouse – she loves the book The Lion Inside so I figured I could just about attempt that much?! I love baking cakes but artwork is not my forte… My backup may be those Schleich toys with party hats, love them! Thanks Lottie!
Quick question for “Ask Lottie” please! If you wanted to write Happy Birthday on a cake, would you use melted chocolate or something else?! Thank you!
You are welcome Annie. A mouse and Lion sounds great. To make the sugar paste mouse just roll a little contend flatten the bottom a bit. Then add some ears and eyes and a long tail. To do the writing I normally use royal icing as it sets harder and is easier to pipe. Alternatively you could use edible paint or an edible pen. Most supermarkets sell them. Makes it quite easy to write rather than fiddling with piping bags. xx
Great, thank you! I will investigate my options x
Lottie your cakes are beautiful. I sadly have no skills in that department so will keep the baking industry alive by ordering mine from talented individuals such as yourself! The last time I tried to bake it was a carrot cake which I started then didn’t have the time to finish before going to see Rhod Gilbert, came back a little bit drunk and tried to finish it, ended up with icing sugar all over the kitchen, me and my bewildered husband.
Anyway, embarrassing baking stories aside I love the alphabet picture and was wondering where it was from? Thank you!
Love a baking disaster. Don’t worry, I took still have the occasional chaotic moment and have to start all over again. The Alphabet picture was from Not on the high street but a few years back. Think they still have it though xx
Thank you I’ll go and take a browse. Love that site!
Great ideas! What recipe do you use for the buttercream? Thanks!
I tend to use two parts icing sugar to one part butter. So for example 150g butter to 300g icing sugar. I then add some milk in to get it to the right consistency for spreading. If you have a mixer or electric whisk use that to get it nice and fluffy xx
Great post!! Your cakes are just beautiful Lottie!!
I’ve been known to make a fair few cakes in my time but since having my little boy and moving to a new area I just haven’t kept up with it. I did some cake decorating courses a few years back and bought all sorts of fancy equipment but, despite this and like you, my forte really doesn’t lie in making all sorts of figurines and/or replicating kids characters so i’ve shy-ed away from doing these a bit. I sort of felt like if I wasn’t good enough to make an exact replica peppa pig then I shouldn’t really offer my services!! *tells self that I am ridiculous!*
However I went for a simple buttercream iced-schleichanimal topped-paper bunting added-cake for my son’s 2nd birthday and got some great comments!
You have inspired me to start thinking about doing some more cake making and decorating again…and perhaps offering to make some for friends again.
Thank you 🙂 x
Thank you Lucette and glad to have given you the baking bug back. The key with most cakes is knowing where your strengths are and mine are most definitely not novelty/character unless they are incredibly simple like the panda cake. I tend to tell people I can’t do the cake when they request something like a model car or a whole cricket scene (they have been regular requests). You should definitely offer your services as it’s always lovely to have a homemade cake xxx
Fab post- thank you!! x
You are welcome x
I’ve really enjoyed making my little girl’s cakes so far (although she is only two!!) – for her first birthday I got a number 1 pan, and this year I attempted a Gaston from Ben and Holly’s Little Kingdom, which I was actually really pleased with (and it wasn’t too difficult!!). For both I’ve used this Mary Berry recipe http://www.bbc.co.uk/food/recipes/celebration_chocolate_18175 which I love – it’s super quick to make, lasts really really well and stays nice and moist, which means I can confidently make it a couple of days before I need it (I really hate being last minute!!). Good tips here Lottie – I love the look of the funfetti icing!! And using figures is a great idea – not sure my 3D sugar paste skills will be that impressive – like you, a flower is about my limit!!!
I’ve had this page saved for months it’s my daughter’s first birthday tomorrow and party at the weekend so going to attempt my first ever cake as an adult (used to bake a lot as a child my mum is brilliant hoping it’s in the genes). Can’t wait to attempt the ombré style cake! Thanks for all the tips xx
Hooray for first birthdays and cake baking! Good luck and enjoy the party x