
It is no secret that I love a spot of crafting. Glitter and paint are some of my best friends. Ok, except when I am sat in a meeting or dropping Molly at school and am told I have glitter on the end of my nose/on my cheek/in my hair. As Charlotte kindly pointed she wasn’t sure if it was intentional and I was trying to start a new beauty trend!
Christmas is the ideal time for getting creative and I’m so lucky the girl’s have inherited my love of it. Molly constantly asks to do craft and although I probably should be doing the pile of ironing I like to make time for something. This Christmas I have got her involved in making all sorts of loveliness and we still have the festive baking to go. I wanted to share a few simple ideas that the little’s can make with you and will be lovely to give to friends or family.
I will specify here that we have a VERY well stocked craft cupboard. I’m talking numerous boxes full of paper, pipe cleaners and feathers. Basically everything we might ever need. We’ve built it up over the years and raid it on many an occasion. However, if you don’t have the contents of Hobbycraft in your cupboards all of these ideas require very little in the way of materials and can generally be made with bits and pieces from around the home or with a few cheap purchases.
Christmas Cards
I am well aware the shops stock a huge selection of Christmas cards but I do love making them myself. I used to spend hours sticking and creating but will admit that now I have kids I head down to Paperchase. Much easier and less time consuming! However, I can still get involved in the children’s card creations instead. All these ideas are super quick and cheap to do. They may get a bit messy at times and I can’t promise you won’t end up covered in glitter. That’s half the fun.
All you need to do is grab a pack of plain cards in a colour of your choice. I opted for white but kraft works really well too. I picked mine up in Wilkinson for about £2 but you can get them in Hobbycraft, WH Smiths or a lot of supermarkets now too.
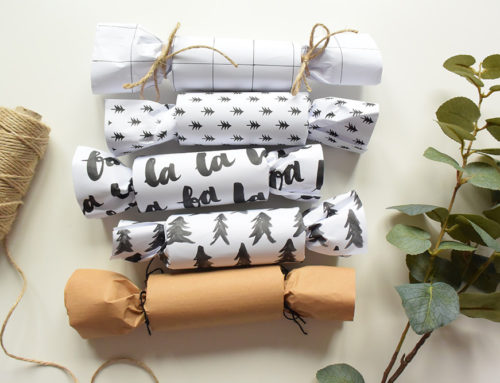
Wrapping
The girls love to choose a little present to give to family now. Whether it is some lego for Daddy (big kid!) or a toblerone for Grandad. I think it is really fun for them to help to wrap them and although Molly would probably prefer Disney princess paper we have used her love of craft to create some fun wrapping ideas this year.
I used a roll of brown parcel paper as the base which you can pick up for next to nothing in most shops.
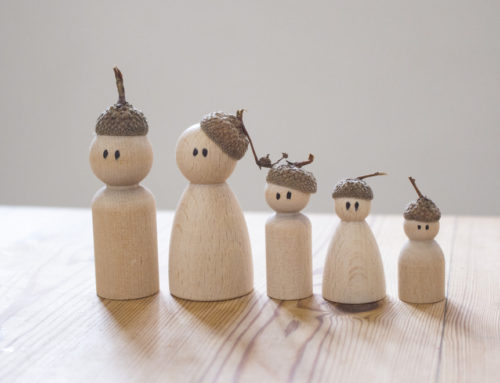
Reindeer Pot
This little cutie is ideal for small gifts for friends or teachers. Fill with chocolate coins, homemade biscuits or any other chosen treats.
You will just need some plant pots in your chosen size. I opted for plastic as probably safer for the kids but terracotta works just as well. You will also need some red pom poms, googly eyes and brown card or paper. I just used the brown parcel paper mentioned above to save buying extra.
Finishing Touches
Salt dough shapes are so much fun to make and the best thing is you barely need anything for them. Salt, flour and water. That’s it.
We use them as gift tags writing on the reverse with a sharpie pen but you can also make pretty tree decorations or garlands from them. Just don’t let the kids eat them. They don’t taste very nice! Once baked you can go to town with the paint and glitter.
To make:
Are any of you planning any Christmas crafts. Are there any I should know about to add to my repertoire?!


We have just done reindeer footprint Christmas cards! Super cute (if I may say so myself ?)
These sound amazing. Must add to next years list. x
This year we have produced a ‘finger print tree’ on canvas for our parents. I drew the branches and we used washable paint to make fingerprints for leaves. This was particularly fun with my 3month old boy and 11month old nephew! Hopefully they’ll like it – it’s turned out pretty well I think.
Ah, what a beautiful gift. I’m sure they will love it x
I can’t wait for Hector to be old enough to do more crafty things. I’ve ordered him some super-sized crayons for Christmas which I know he’ll love if his adventures with my biros are anything to go by. Seriously considering creating a crafting cupboard in the new house…
A crafting cupboard is a must Lolly. Even if it is only for us to use! Basically I just have a load of big boxes full of stuff. Hector will love crayons although hopefully only on paper. Once I was busily chatting on the phone and hadn’t realised that Molly had drawn over every wall downstairs, on the sofa, all the kitchen chairs (I was sat in the kitchen how did I not notice!) and all over her baby sister. ‘Look mummy I’ve drawn you a picture on Alice!’. Worst of all it was in Sharpie pen so required a lot of repainting!! x
EEEK!!! The thought was there at least 😉
I don’t have any children yet (although I am pregnant) but I may have to steal some of these ideas for my own wrapping, particularly for my nephews!
Steal away Sarah! I actually think they would be great for adults too if you changed the colours a bit. And were a smidgen neater than my children! x
Ahhh these are such lovely ideas, my little girl is only 18 months so a bit young at the moment but I’ll definitely be saving these for inspiration when she’s a bit older! I’m not very good at coming up with creative things myself but really want to do stuff like this with her in future… Your girls are very lucky to have a mummy like you! 🙂 x
Thanks Sarah. I love making things with them but sometimes do dread the mess that ensues! There are so many easy peasy crafty things and my girls have enjoyed making stuff from quite a young age. Lots of drawing and stickers to start with as that creates minimum mess! Plenty of ideas to be found on pinterest too x
Thank you for some fab ideas! My two year old loves crafting and this morning we were making hand print robins with googly eyes and red glittery chests, obviously a certain amount of artistic license used! I have failed with potato prints but the cookie cutters are a great idea, going to try them for sure. I’ve recently discovered Wilkos crafting section and it’s so reasonable. Definitely enjoying reliving my Blue Peter crafting days! x
These robins sounds AMAZING! I too am a fan of Wilkos craft section. We love their foam stickers for all sorts of craft ideas. As an alternative to potato printing stick some of the foam shapes on to a rolling pin, roll through paint and then on to the wrapping paper. It’s a great effect. Works well with a rolling pin covered in bubble wrap too. Obviously the rolling pin may not be suitable for making your mince pies with afterwards! x